html How to give AI access to Instagram — a practical guide | CHI
EN RU TR
CHI Blog · AI Muse · Practical Guide

How to give AI
access to your Instagram

Set up the “Instagram → Meta app → access token” connection once, and then your AI (Claude, ChatGPT, any bot) can read statistics, reply to comments, and post for you. No account password needed, no risk of blocking. Below are step-by-step instructions with real, clear screenshots.

20–30 minutes one time 💳 Free 🔒 No Instagram password needed 🧑‍💻 No coding knowledge required

01Why this matters and what you'll gain

Instagram does not allow bots to log in with a password — it's risky and leads to bans. Instead, there's an official, secure method: you grant the program an access token with a clear list of permissions. The token can be revoked at any time, and no one sees your password.

📊
Read statistics

Reach, impressions, saves, top posts — the AI retrieves the numbers itself and draws conclusions.

💬
Reply to comments

The bot sees new comments and responds in your tone — you just confirm.

📤
Publish Reels and posts

A finished video with a cover goes live on schedule, without manual upload.

📥
Read incoming messages

Direct messages and mentions are collected in one place — the AI sorts and suggests replies.

The main reassuring point: you are not giving away your password. You are issuing a limited token that you created yourself, you see the list of permissions, and you can revoke it with one click. This is an official Instagram mechanism, not “gray” automation.

02How it works — in 30 seconds

Between you and the AI is one layer — the “Meta app.” This isn't a downloadable program, but simply an entry in the developer console that can issue tokens. The full scheme:

📸
Your Instagramprofessional account
🧩
Meta Appcreated in 5 min
🔑
Access Keylong token string
🤖
AIClaude / bot / script

The task is to follow the arrows from left to right one time. In the end, you'll have two things: access token (long token) and Account ID (number). You give these to the AI. That's it.

03What you'll need before starting

Check these three points — most people stumble here. If you have everything, it will go smoothly.

RequiredHow to check / enable
1. Professional Account
(Business or Creator)
A regular personal account won't be allowed by the API. In the Instagram app: Settings → Account type and tools → Switch to professional account. Choose "Creator" or "Business" — both work. It's free and reversible.
2. Facebook AccountYou need any personal Facebook account to log into the Meta developer console. Instagram and Facebook are the same company, so the login is shared.
3. Computer and BrowserIt's easier to do all the setup from a laptop — there are many small buttons in the developer console. You can do it from a phone, but it's harder.
💡
Switching to a professional account doesn't break anything on your blog and isn't shown to followers as "business." You can switch back to a personal account at any time.

04Two paths: choose yours

Meta offers two methods. In July 2024, they added a simpler one — we'll follow that. The old one (via a Facebook Page and Graph API) is more powerful — that's the "everything is hidden in the Facebook console" method, which Anastasia used. An honest comparison:

Recommended for beginners

🟢 Simple Path
Instagram Login · since July 2024

  • Facebook Page NOT needed
  • Get the key and ID with a button directly in the console
  • 6 clear steps, ~20 minutes
  • Enough for reading, publishing, replying
Suitable for 9 out of 10 people → section 05
Anastasia's method

🟠 Advanced Path
Facebook Login + Graph API

  • Requires a Facebook Page linked to Instagram
  • Get the key via "Graph API Explorer"
  • More steps and small buttons
  • Needed if you also manage a FB Page
Classic, if you already have an IG + FB Page link → section 06

05Simple Path — 6 Steps

Instagram Login. Keep one website open — developers.facebook.com. Everything is done there.

⚡ In short — the whole path in 6 clicks

  1. My Apps → Create App — create an app
  2. Scenario «Manage content on Instagram», type Business
  3. Product Instagram → Set up → API Setup with Instagram Login
  4. Check permissions (checkboxes: basic, content_publish, manage_comments)
  5. Add Instagram account → log in → Allow → copy ID + token
  6. Generate token — copy the ready long-lived key (~60 days)
Step 1
1
developers.facebook.com

Go to Meta for Developers

Open developers.facebook.com and log in with your regular Facebook account — button «Continue with Facebook». If Meta asks you to confirm that you are a developer — agree, enter the code from your phone/email. A one-time formality, no payment required.
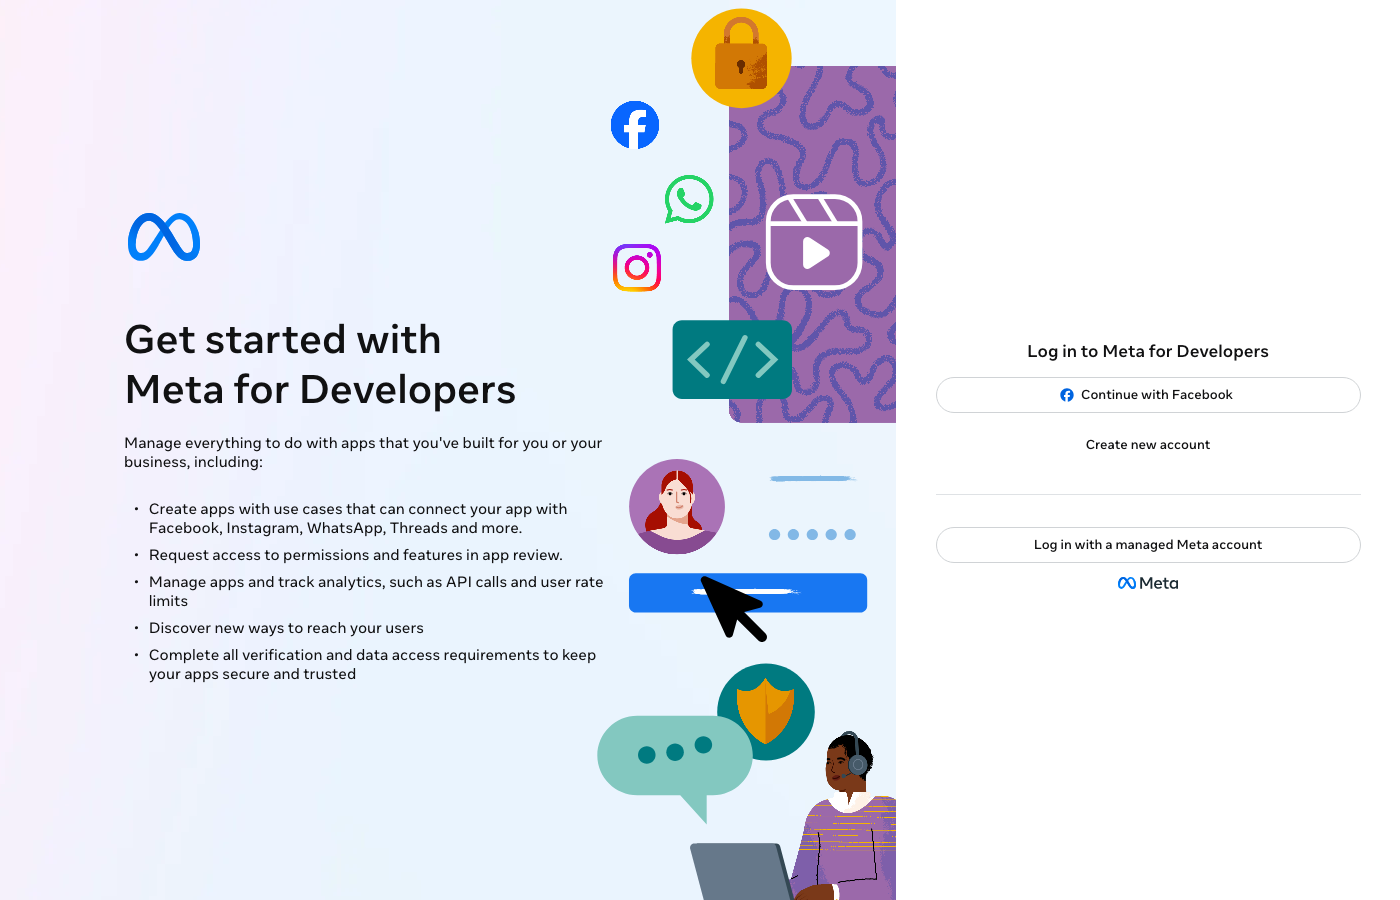
📸 Real screen · developers.facebook.com — login
https://developers.facebook.com
Meta for Developers login screen — Continue with Facebook button

Actual screen from the original guide package.

Step 2
2
My Apps → Create App

Create an app

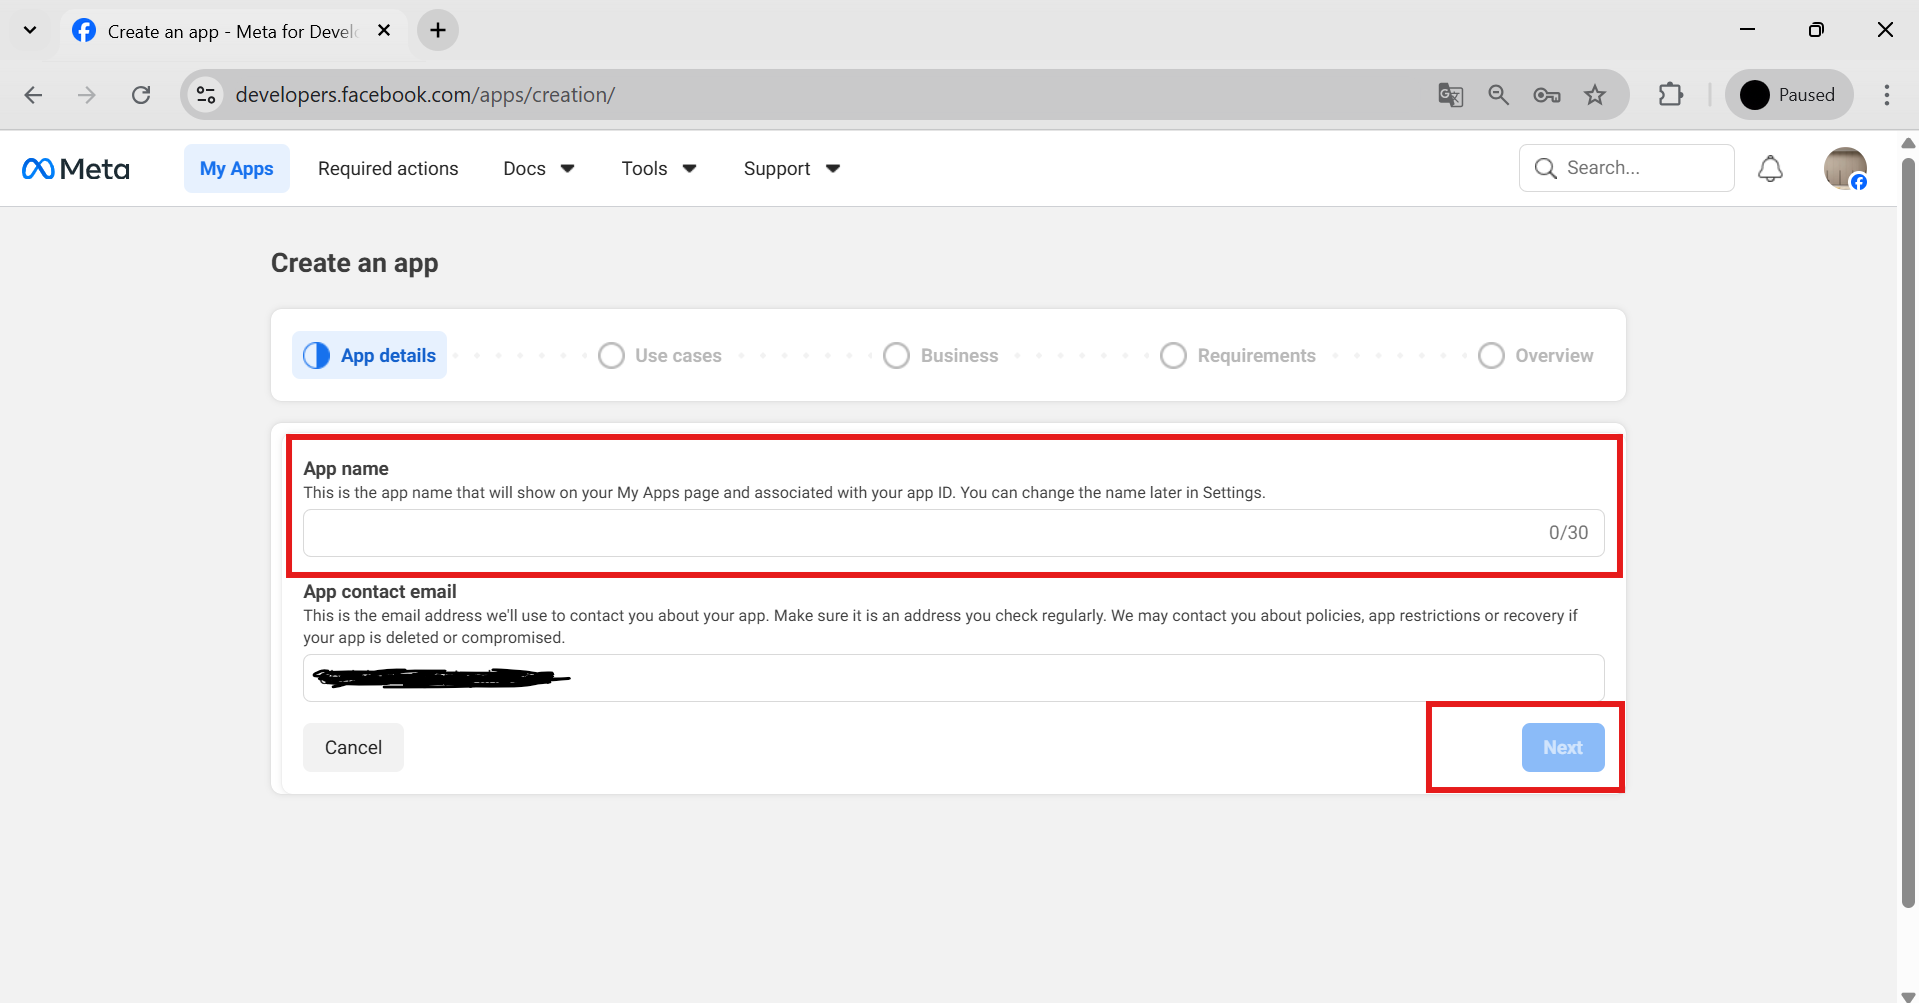
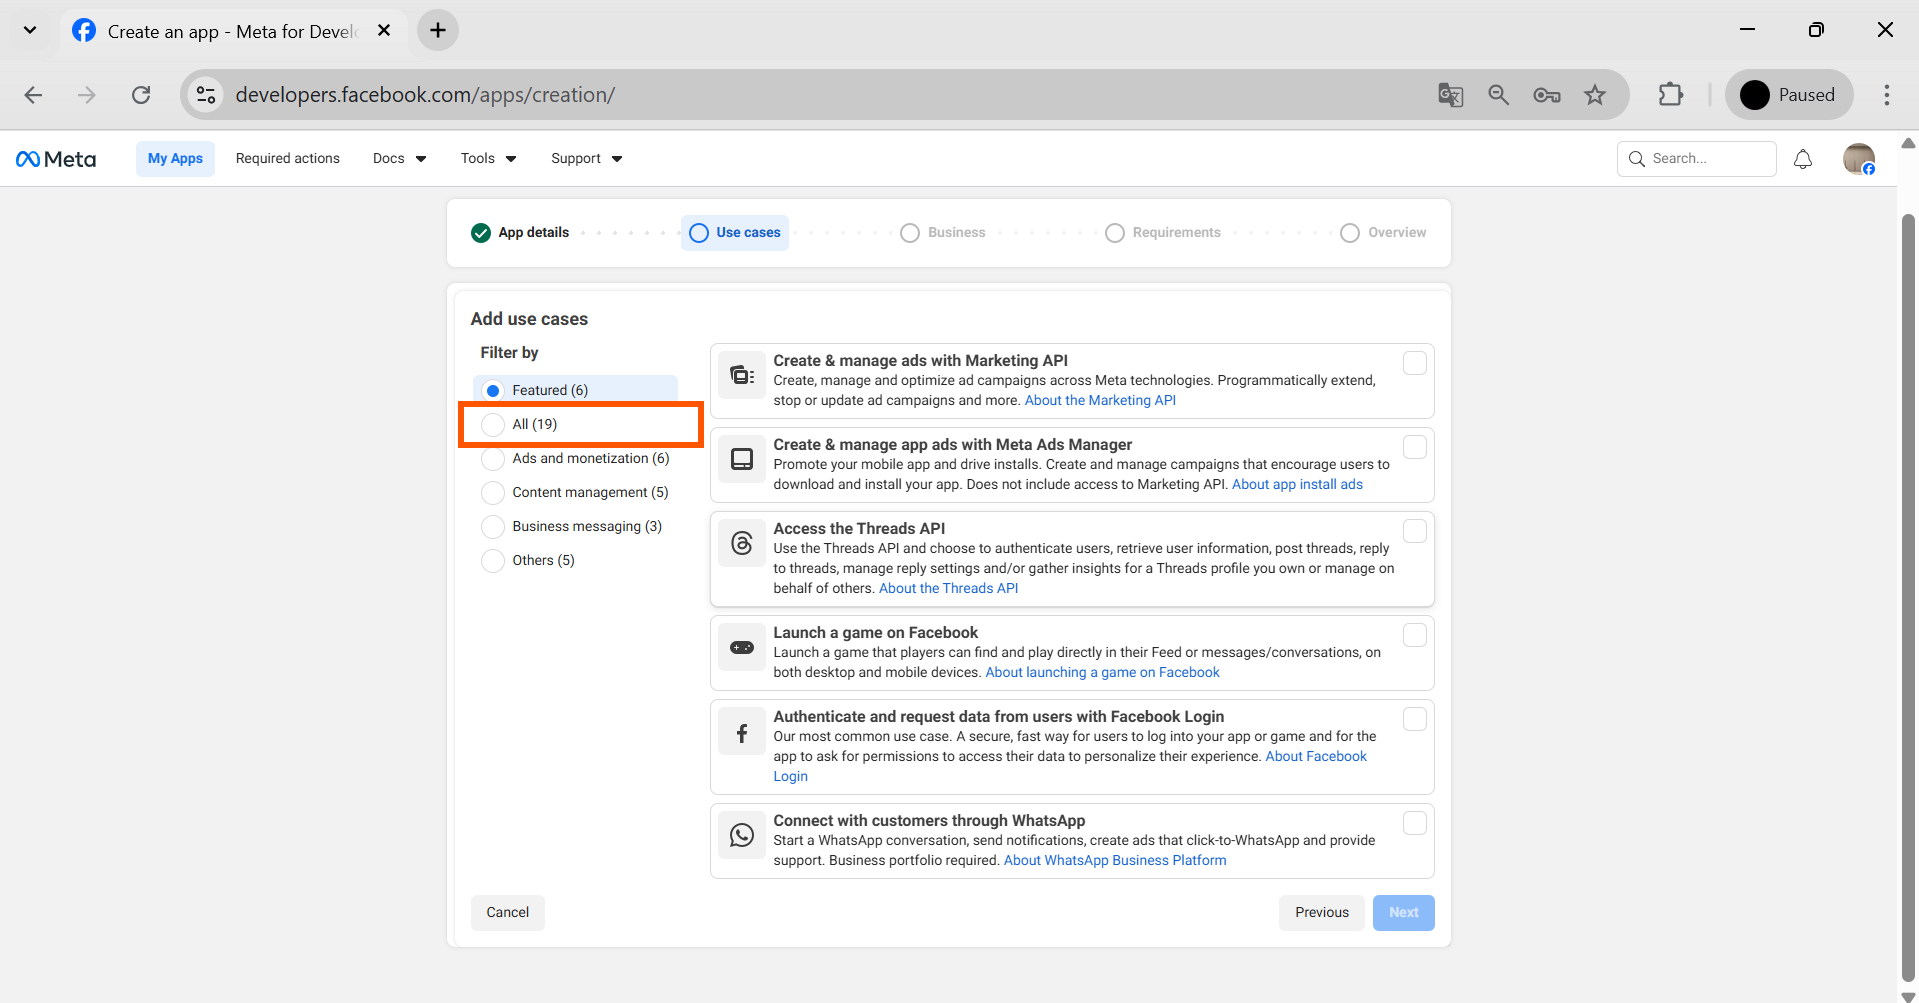
Top right — My Apps, then the green button Create App. Meta will ask what the app will do. Select the item about Instagram — «Manage messaging and content on Instagram», then type Business, come up with any name and click Create.
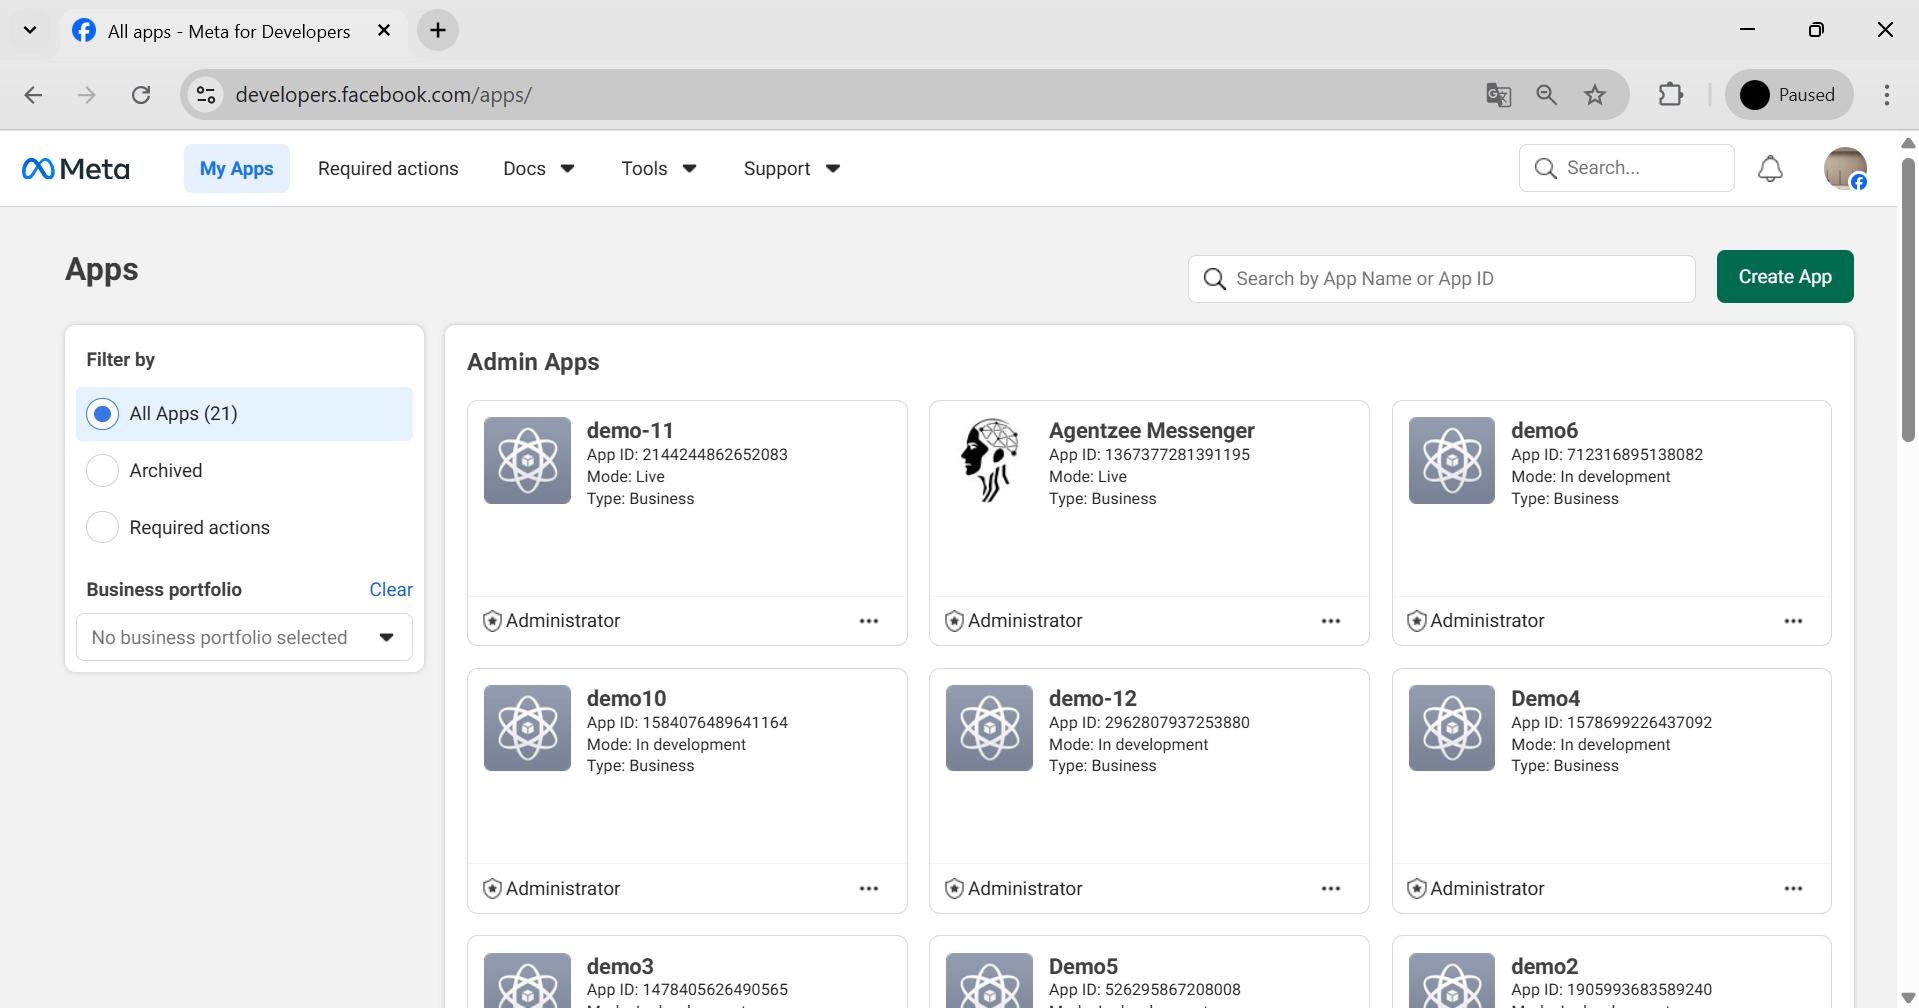
🎨 How it looks · app scenario selection
developers.facebook.com/apps/create
Meta for Developers
What will the app do?
Choose a scenario — it determines which products will be connected automatically.
Manage messaging and content on InstagramManage messaging and content on Instagram
Authenticate and request data via Facebook LoginAuthenticate and request data…
OtherOther
Choose the top one — about Instagram
Next →
Actual screens · March 2026
Meta for Developers: My Apps page and Create App button
1. My Apps → Create App. The create button is in the top right.Source: AgentZee, 03/30/2026 · click to enlarge
Meta for Developers: App creation form with name
2. App Name. Enter any clear name and proceed.Source: AgentZee, 03/30/2026 · click to enlarge
💡
Meta periodically changes screen names. If you see different text, look for the meaning: “something about Instagram + content.” If asked for the app type — Business.
Step 3
3
App Dashboard → Instagram → Set up

Connect the “Instagram” product

You are in the app dashboard. Find the card Instagram and click Set up. Then, in the left menu, expand Instagram and select “API Setup with Instagram Login”.
🎨 How it looks · app dashboard and left menu
Meta for Developers · My Assistant
Instagram
Set up
🔐 Facebook Login
Set up
1 Click Set up on the Instagram card
2 On the left, select “API Setup with Instagram Login”
Actual screens · March 2026
Meta for Developers: Selecting the Manage messaging and content on Instagram scenario
1. Select Instagram use case. You need a scenario for Instagram messages and content.Source: AgentZee, 03/30/2026
Meta for Developers: Selecting API setup with Instagram login
2. Open API setup with Instagram login. Don't confuse it with Facebook Login.Source: AgentZee, 03/30/2026
⚠️
There will be a similar item nearby “API Setup with Facebook Login”. For the simple path, it is NOT needed — this is a different option via a Facebook page (Anastasia uses this one, see section 06). Click specifically with Instagram Login.
Step 4
4
Section Permissions

Check permissions — what the bot is allowed to do

The list of checkboxes is “what the neural network is allowed to do.” Check what's needed. The basic set for “read + publish + reply”:
🎨 How it looks · permission checkboxes
Permissions
Check only what's needed — fewer permissions are safer.
instagram_business_basic — read profile and media
instagram_business_content_publish — publish posts and Reels
instagram_business_manage_comments — read and write comments
instagram_business_manage_messages — manage direct messages
Actual screen · March 2026
Meta for Developers: Permissions and features section for Instagram
Where to find permissions. Open use case → Permissions and features; the necessary permissions are added in this table.Source: AgentZee, 03/30/2026 · click to enlarge

Don't be intimidated by the English names — these are just checkboxes describing actions.

Step 5
5
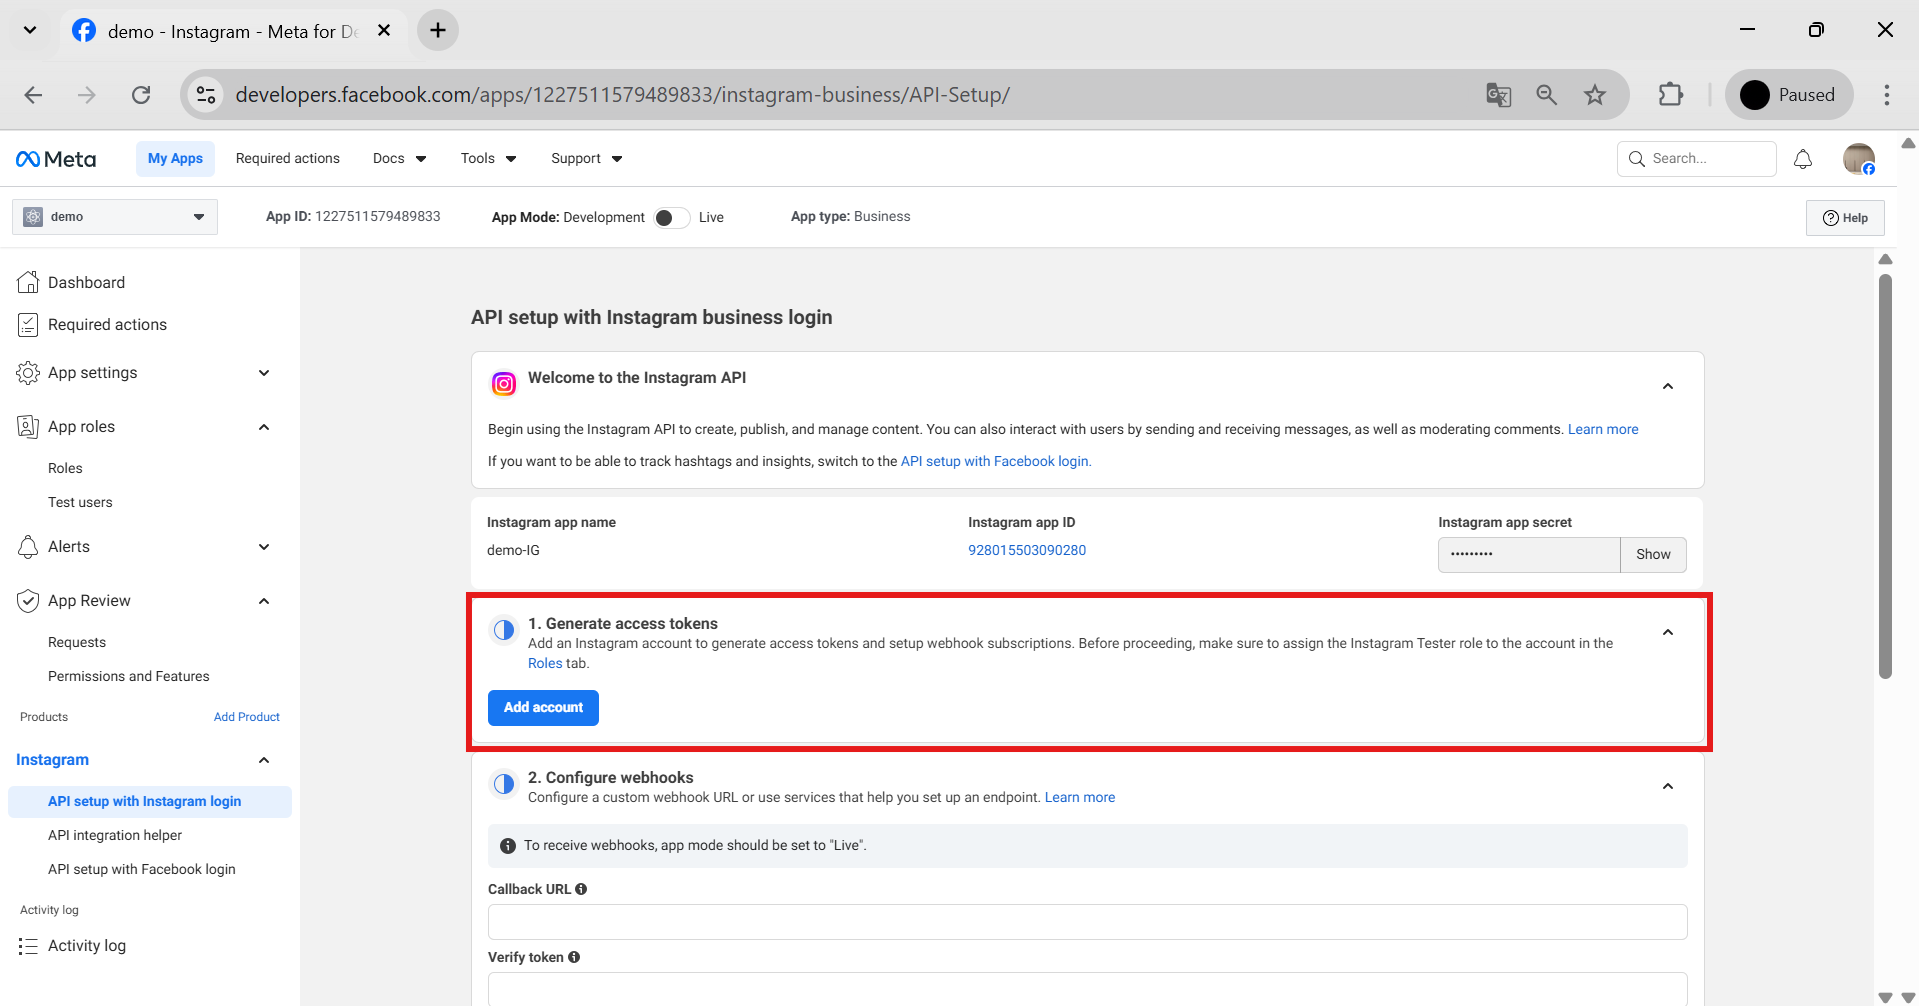
Generate access tokens → Add account

Connect your Instagram and get a key

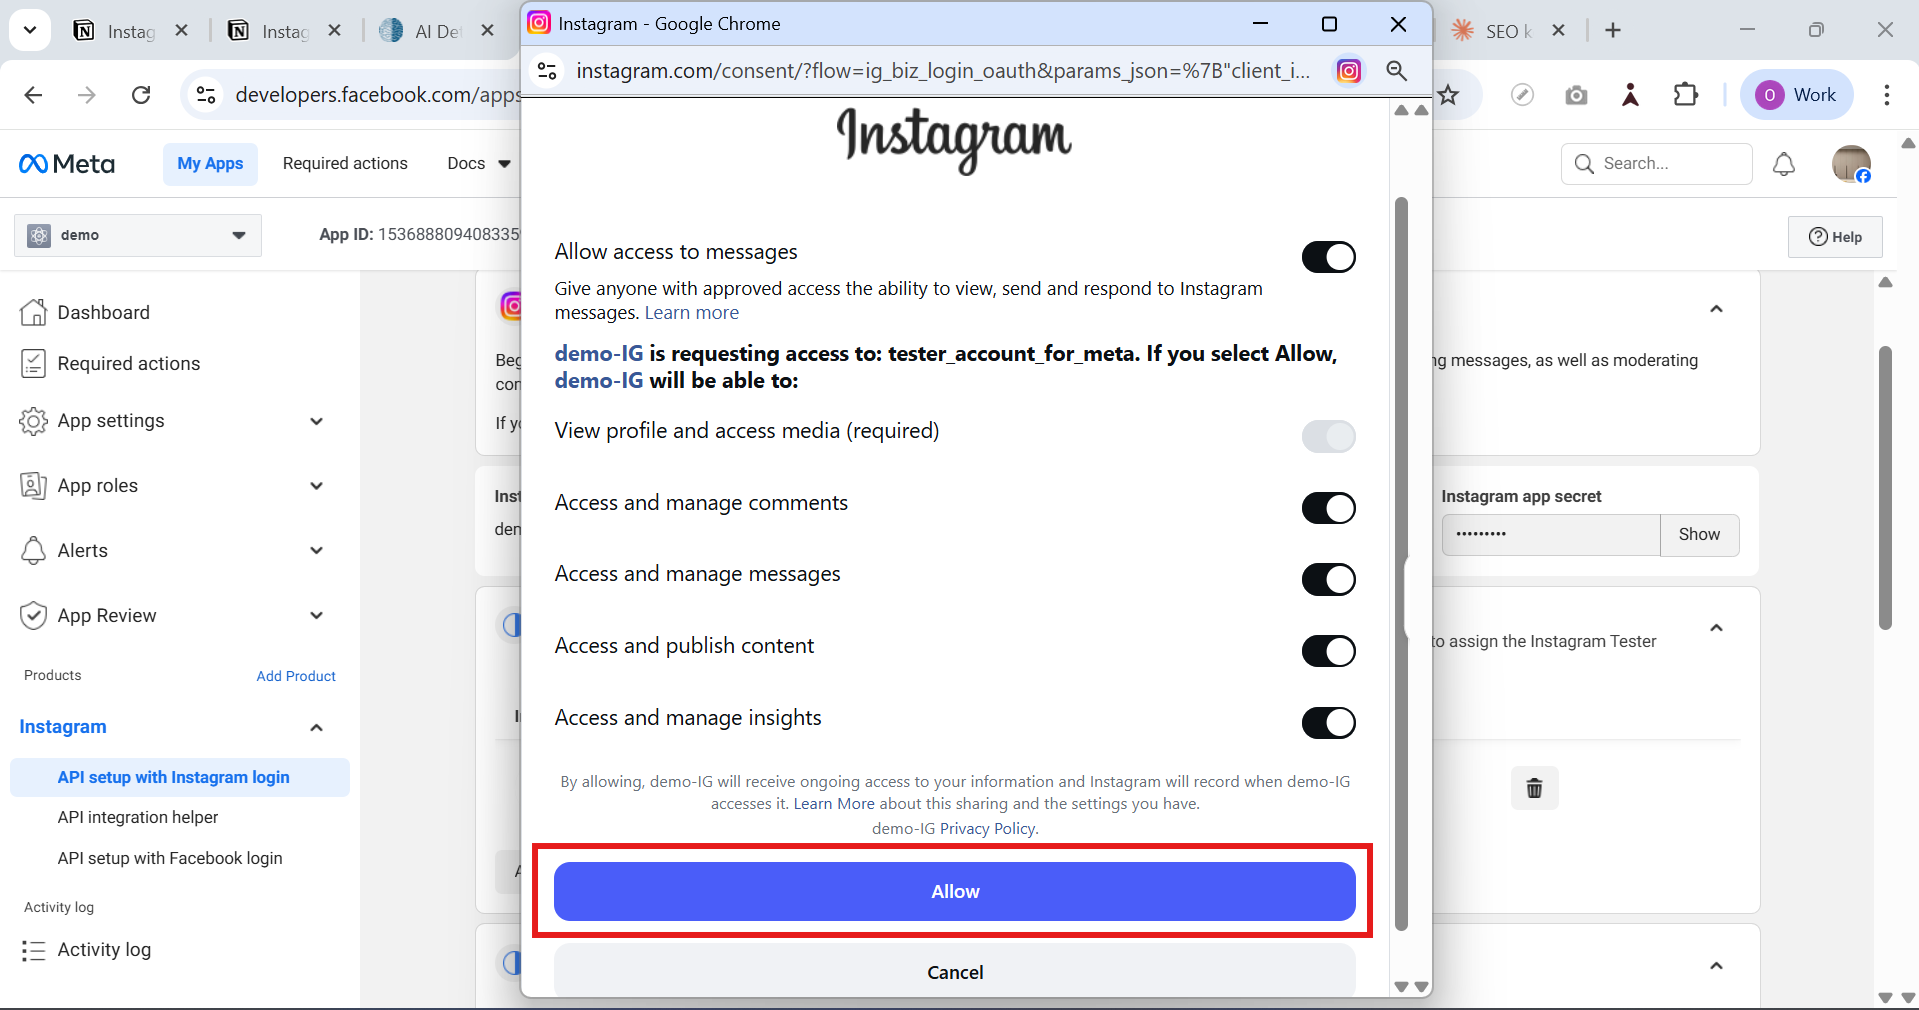
Find the block Generate access tokens and click Add Instagram account. An Instagram login window will open — log in with a professional account and click Allow. After this, two valuable things will appear — copy both to a note:
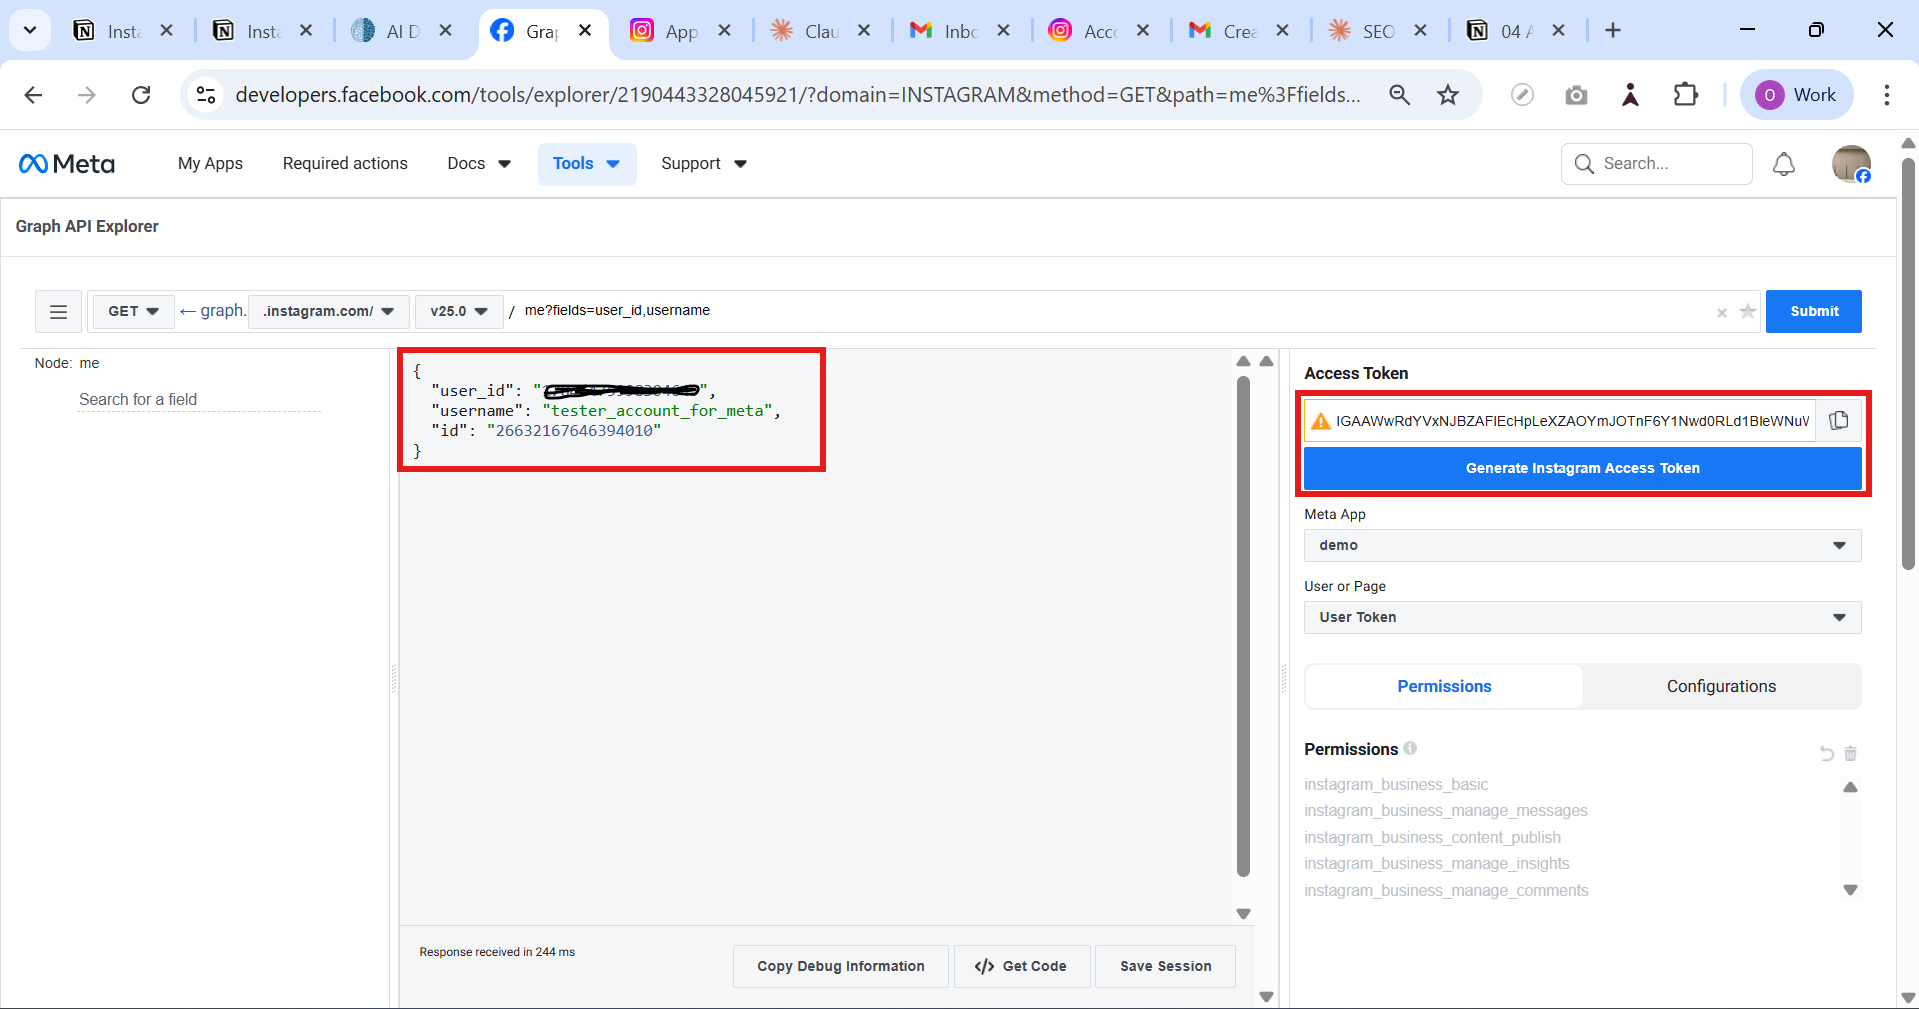
🎨 How it looks · your ID and key after connecting
Generate access tokens
+ Add Instagram account
Instagram account ID (number)178414XXXXXXXXXXX
⧉ Copy
Access tokenIGAAXXXXXXXXXX…very long string…
⧉ Copy
Both values — to a secure note
Actual screens · March 2026
Meta for Developers: Generate access tokens block and Add account button
1. Generate access tokens → Add account. Look for this block further down the Instagram settings page.Source: AgentZee, 03/30/2026
Instagram: Permissions window with Allow button
2. Check permissions and click Allow. After this, you will return to the Meta dashboard.Source: AgentZee, 03/30/2026
🔐
A token is like a password. Do not publish it, do not send it in chats, and cover it in screenshots. Store it in a private note or file that only you can see. (The values above are fictional placeholders, not real.)
Step 6
6
Generate token → I understand → Copy

Generate and copy the ~60-day key

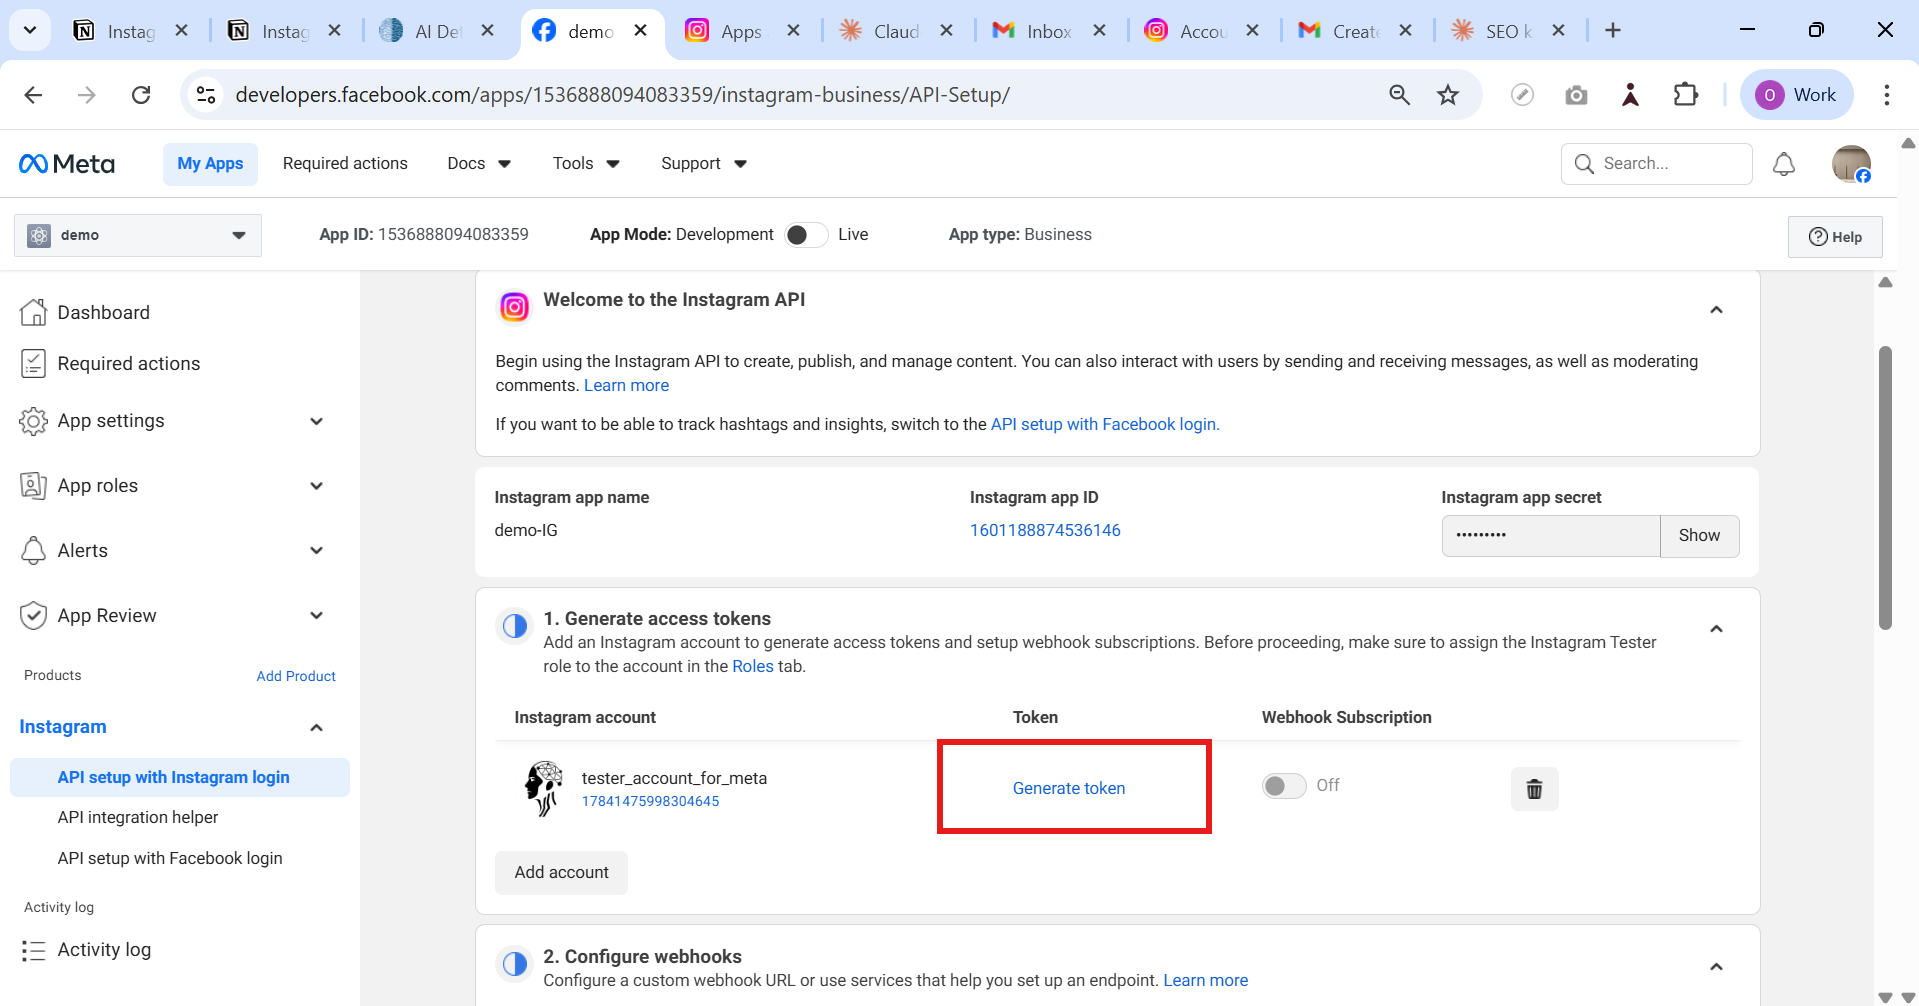
After connecting the account, click Generate token. Confirm the warning “I understand” and immediately copy the string: the current Instagram Login dashboard already provides a long-lived token for approximately 60 days. There is no need to separately exchange the hourly token in this process.
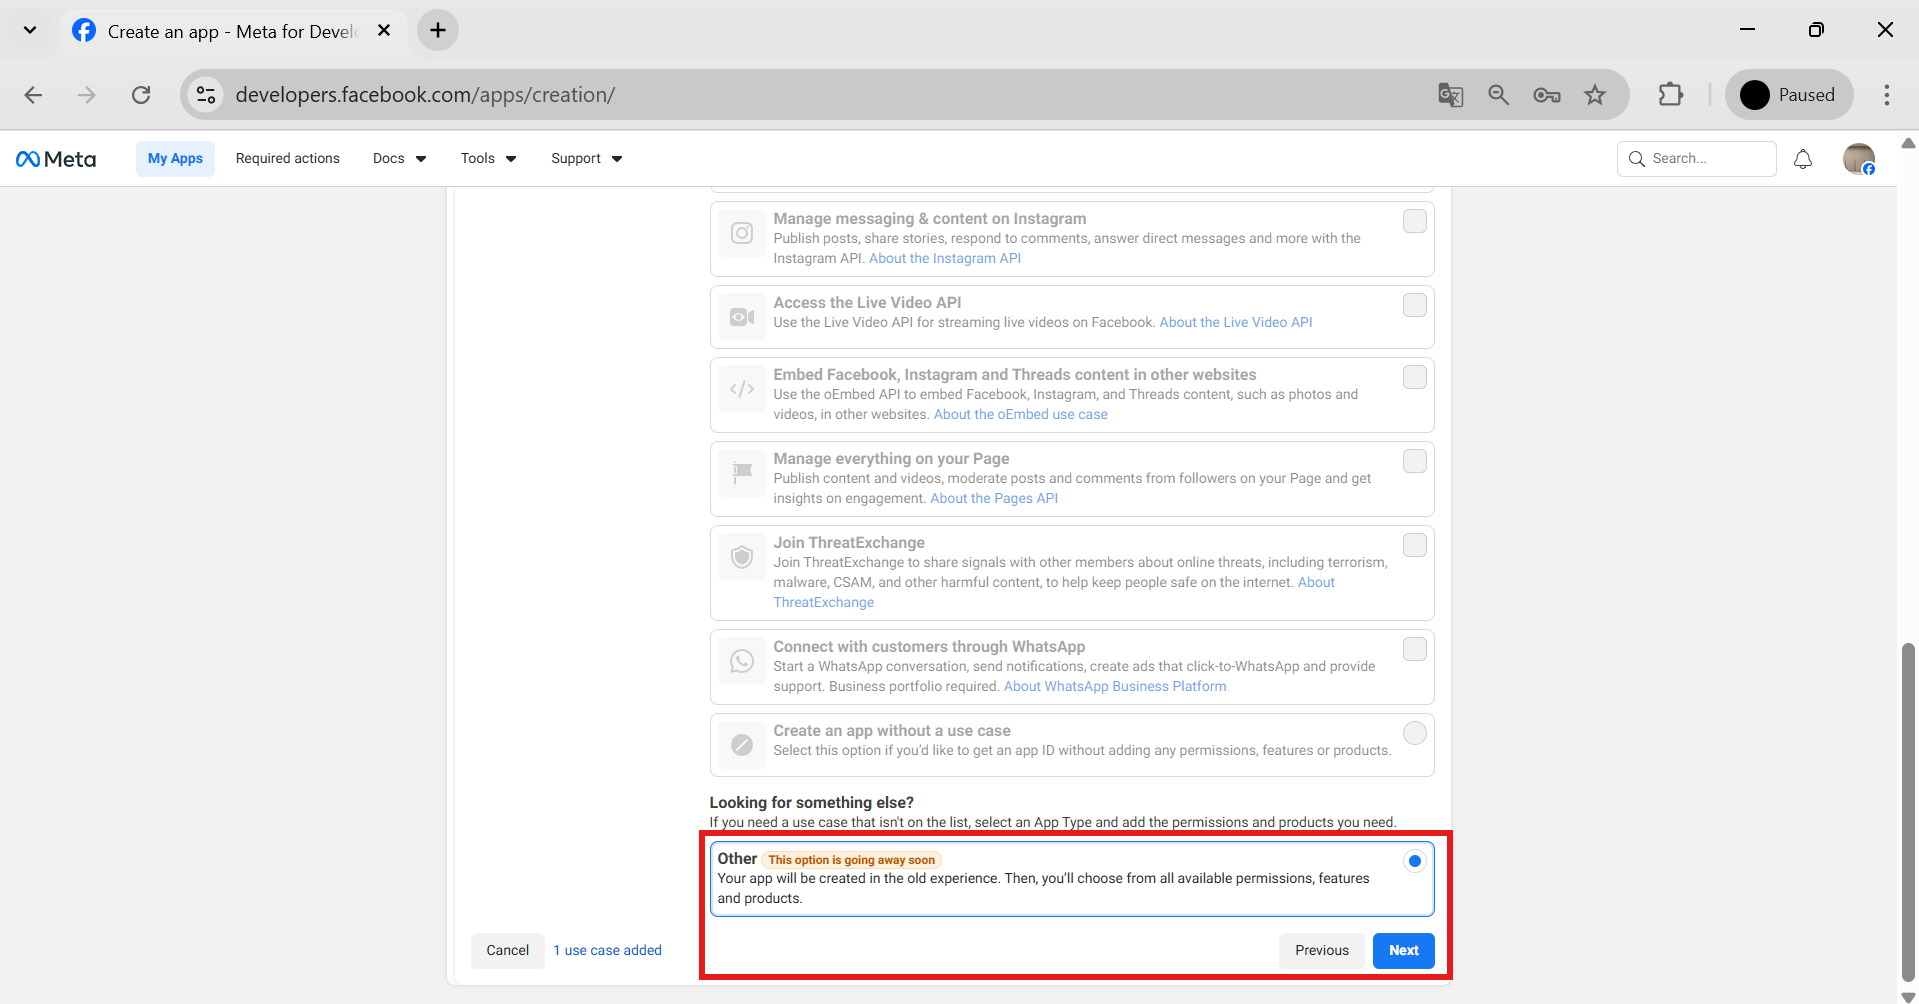
Actual screen · March 2026
Meta for Developers: I understand confirmation before issuing Instagram access token
Check the I understand box and click Copy. The full key is shown only once — save it immediately.Source: AgentZee, 03/30/2026 · Meta interface
🎉
Done! You have Account ID (number) and a long-lived token (60 days). Next, feed them to the neural network → section 07.
6 · ADVANCED

06Advanced Path — Graph API (how Anastasia connected)

The classic option: Instagram Graph API with Facebook Login. This is needed if Instagram is linked to a FacebookPage or if you need to work with both platforms. This is where the Graph API Explorer tool comes in — you use it to manually obtain the token.

🧭
Prerequisite. You must have a FacebookPage (not a personal profile), and your Instagram account must be linked to it. To check/enable: Meta Business Suite → Settings → Linked Accounts → Instagram → log in and confirm.
A1
1

Create an app and add products

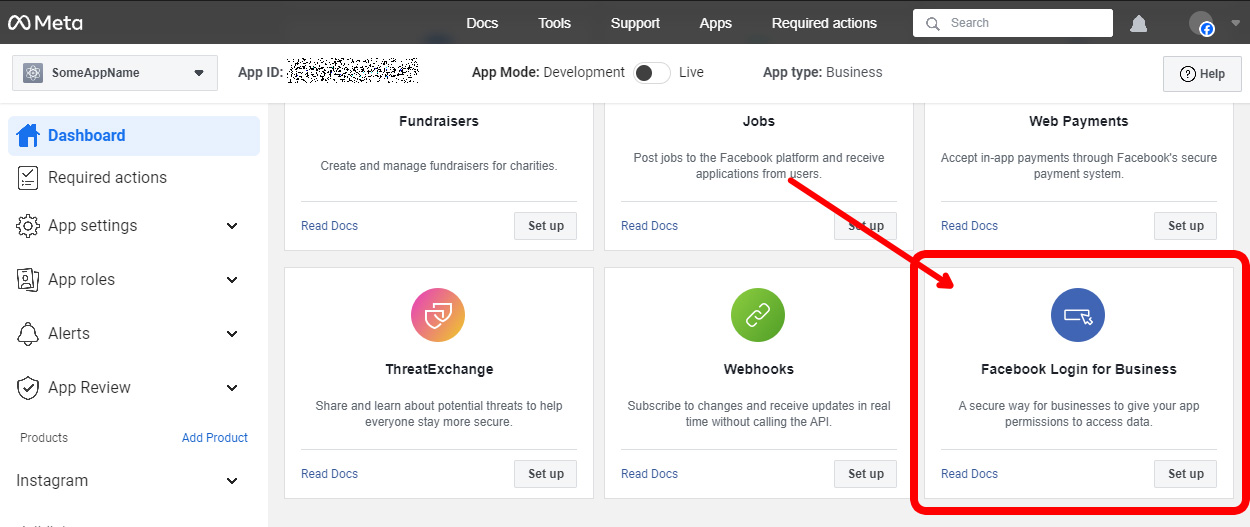
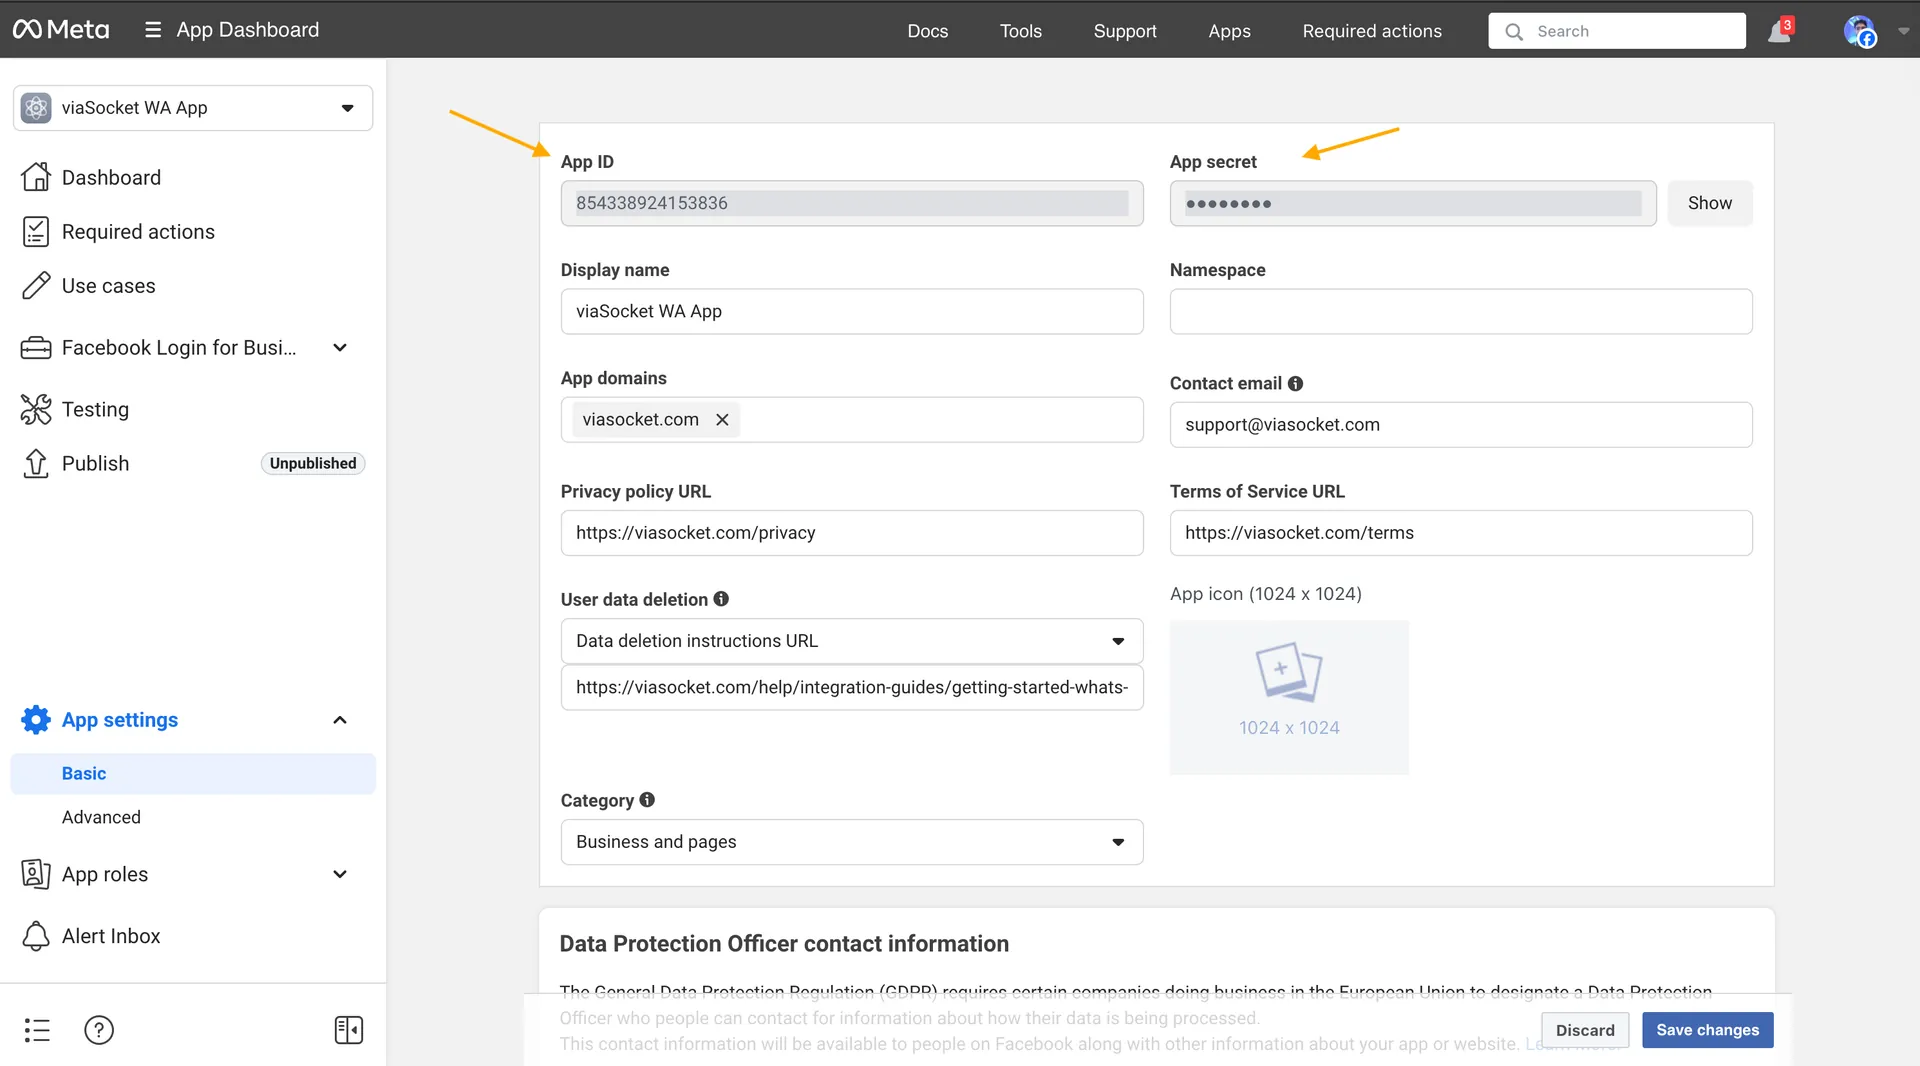
As in steps 1–2 of the simple path, type — Business. In the dashboard, add the products Instagram Graph API and Facebook Login for Business. In App settings → Basic record the App ID and App Secret (these will be needed to renew the token).
Actual screens · April 2026
Meta for Developers in English: Facebook Login for Business add page, Instagram already added to menu
1. Add products. Instagram is already visible on the left, and you need to click Set up on the Facebook Login for Business card.Source: Olegnax · Meta English interface
Meta for Developers in English: App settings Basic with App ID and hidden App Secret
2. App settings → Basic. App ID and App Secret are located here; keep the secret hidden and do not publish it.Source: viaSocket · Meta English interface
A2
2
developers.facebook.com/tools/explorer

Open Graph API Explorer and get a token

In the top right, select your app. Click Generate Access Token and check the permissions in the list (below). Log in, allow access — you will receive a User Token (short-lived).
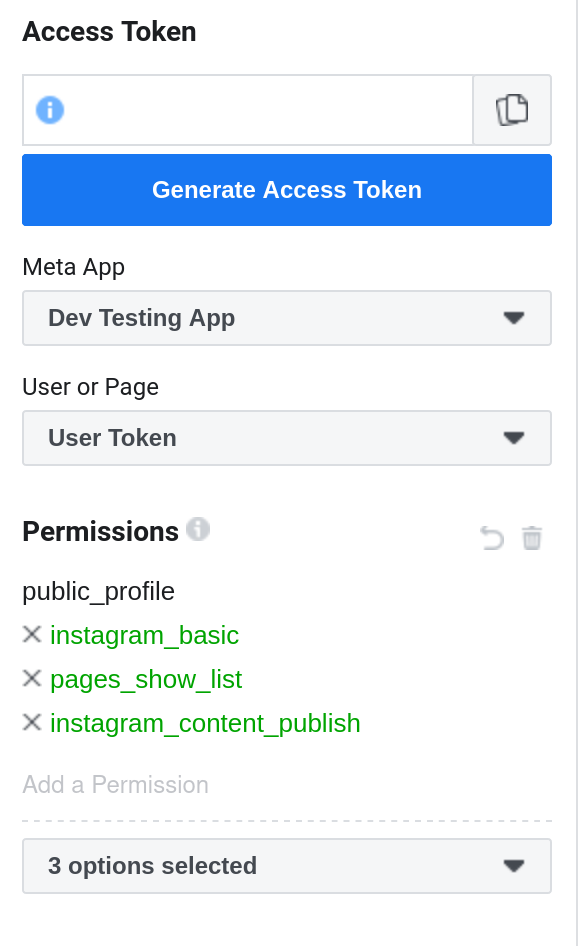
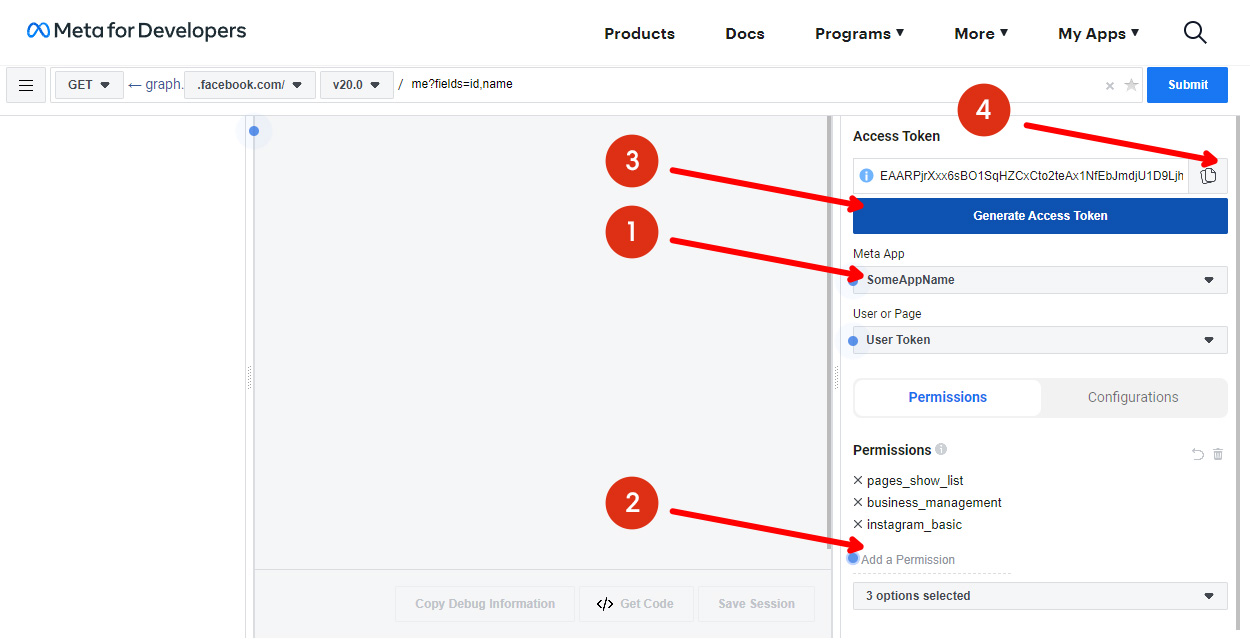
🎨 What it looks like · Graph API Explorer — left panel + permissions
developers.facebook.com/tools/explorer
Graph API Explorer
Meta App
My Assistant
User or Page
User Token
instagram_basic
instagram_content_publish
pages_show_list
pages_read_engagement
Generate Access Token
GETv23.0me/accounts
Enter your query from step 3 here
Access TokenEAAGxxxxxxxxxxxx…
⧉ Copy
Actual Graph API Explorer screens · April 2026
Graph API Explorer: Selecting app and User Access Token type
1. Select your app and User Token. The necessary dropdowns and Permissions are in the Explorer sidebar.Source: Bitoff · English Graph API Explorer
Graph API Explorer in English: Meta App, User Token, Permissions, and Generate Access Token
2. Check Permissions. On the right, select the app, User Token, add permissions, and click Generate Access Token.Source: Olegnax · English Graph API Explorer
# select these permissions (scopes):
instagram_basic            instagram_content_publish
instagram_manage_comments  instagram_manage_insights
pages_show_list            pages_read_engagement            business_management
A3
3

Find the Page ID and its token

In the Explorer query field, enter me/accounts and click Submit (▶). The response will be a list of your pages. Copy the id of the desired page (this is the IG_PAGE_ID) and its access_token (IG_PAGE_ACCESS_TOKEN).
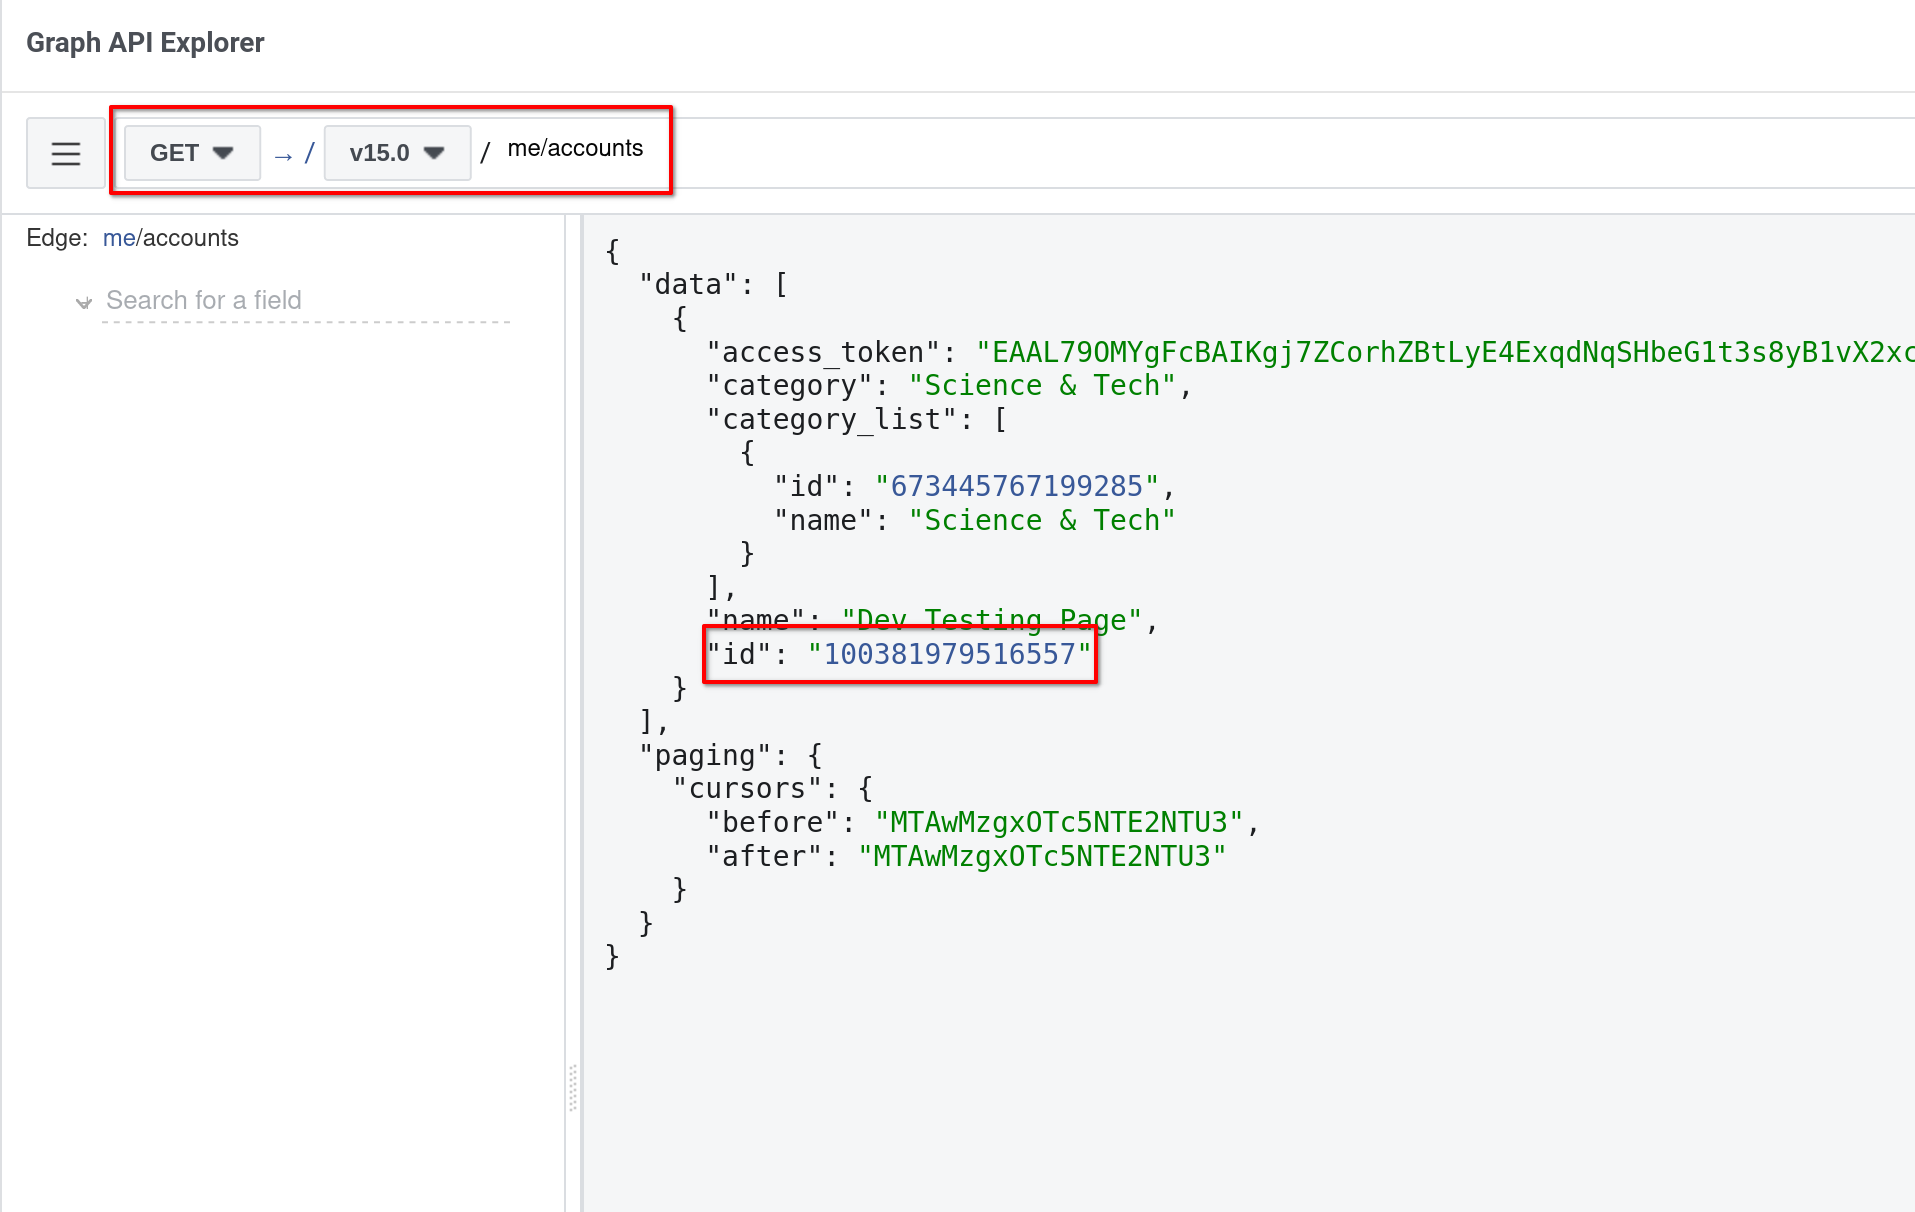
🎨 What it looks like · query response me/accounts
GETv23.0me/accounts
{ "data": [ { "name": "My Blog", "id": "10223XXXXXXXXXXX", ← IG_PAGE_ID "access_token": "EAAG…long string…" ← page token } ] }
Actual API response · April 2026
Graph API me accounts response with list of pages, IDs, and access token
What to look for in the response me/accounts. For the desired page, save the fields id and access_token.Source: Bitoff · English Graph API Explorer · click to enlarge
A4
4

Retrieve the Instagram account ID

Using the Page ID, we get the associated Instagram business account. Enter the following query in Explorer:

{PAGE_ID}?fields=instagram_business_account
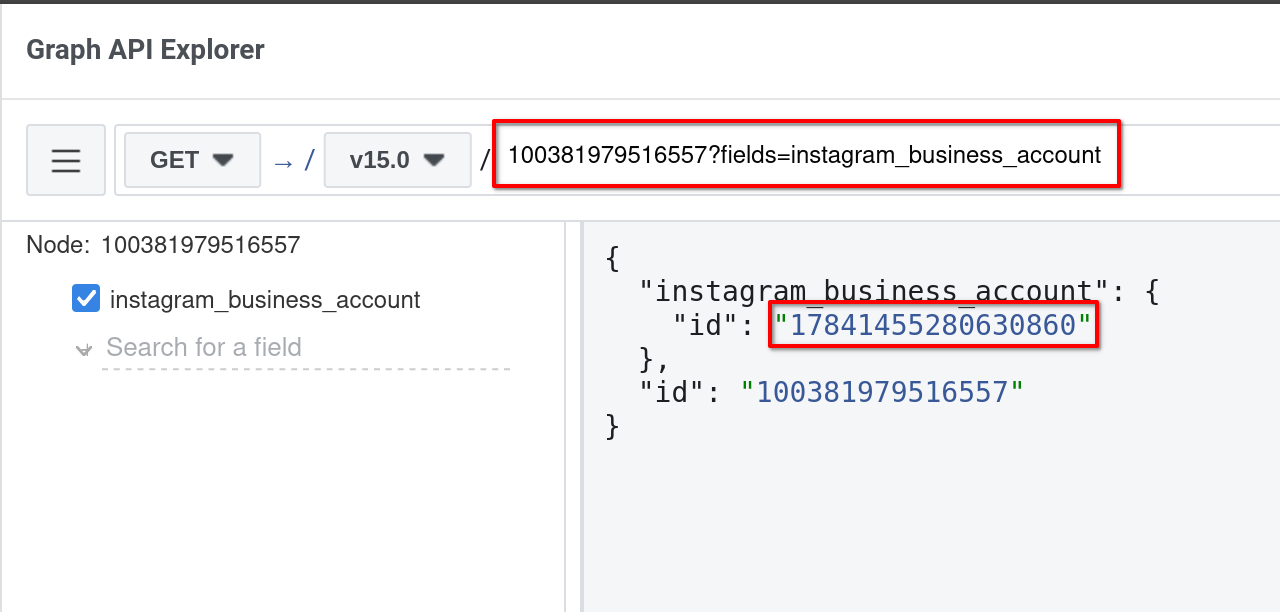
🎨 What it looks like · field instagram_business_account.id
{ "instagram_business_account": { "id": "178414XXXXXXXXXXX" ← this is your IG_USER_ID }, "id": "10223XXXXXXXXXXX" }
Actual Request and Response · April 2026
Graph API Explorer: Requesting instagram_business_account field and Submit button
Request and response on one screen. Insert {PAGE_ID}?fields=instagram_business_account and copy the nested instagram_business_account.id — this is IG_USER_ID.Source: Bitoff · English Graph API Explorer
A5
5

Make the token long-lived (60 days)

Exchange the short-lived token for a long-lived one by making an API request (you'll need the App ID and App Secret from App settings → Basic):

GET https://graph.facebook.com/v23.0/oauth/access_token
  ?grant_type=fb_exchange_token
  &client_id={APP_ID}
  &client_secret={APP_SECRET}
  &fb_exchange_token={short_lived_token}

You'll receive a 60-day long-lived token. Repeat me/accounts with it — you'll get a long-lived page token. Store this one.
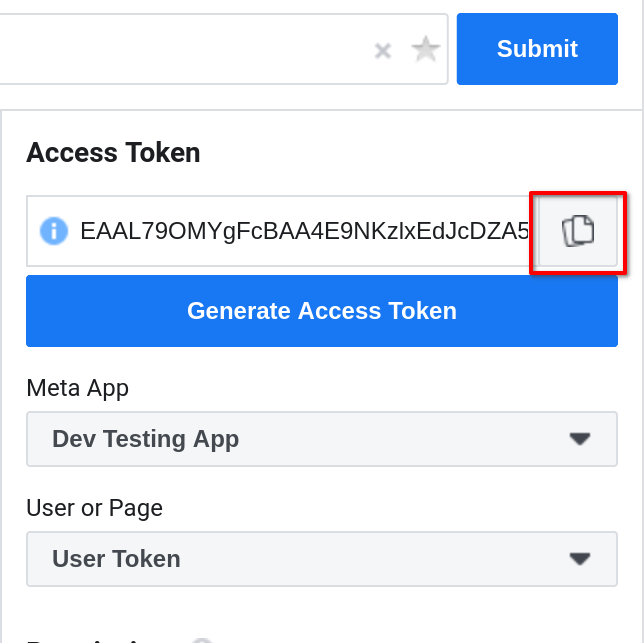
Where to copy the token before exchanging it
Graph API Explorer in English: Copy to clipboard button next to access token
Copy the short-lived token using Copy to clipboard and insert it into the fb_exchange_token of the request above. Only store the new token from the JSON as a secret.Source: Bitoff · English Graph API Explorer
🗂
Final set for this path — this is how Anastasia's file is structured .env:
IG_APP_ID=...
IG_APP_SECRET=...
IG_USER_ID=...            # Instagram account ID
IG_PAGE_ID=...            # Facebook Page ID
IG_PAGE_ACCESS_TOKEN=...  # long-lived Page token
IG_HANDLE=...

07How to give the token to your AI

You have the key and ID — now you just need to put them where your neural network can read them. Two methods, by complexity.

Method A — Simple: the .env file (Anastasia's method)

Create a text file named .envnext to your project. Write the key and ID line by line into it. The script will read the file itself:

# .env — stored locally and never uploaded
IG_USER_ID=178414XXXXXXXXXXX      # account ID (placeholder)
IG_ACCESS_TOKEN=IGAAXXXXXXXX...   # long-lived token (placeholder)
IG_HANDLE=my_blog                # your @handle for reference

That's it — your neural network can now access Instagram. If you're working with Claude/ChatGPT/your own bot, just say: "Instagram data is in .env, keys are IG_USER_ID and IG_ACCESS_TOKEN».

Method B — Claude's "native" button: MCP server

There are ready-made "bridges" (MCP servers) that connect Instagram to Claude as an integrated tool — then commands like "publish," "read statistics" are visible directly in Claude. An open-source project is ig-mcp on GitHub. You provide it with the same key and ID as input. It's more powerful, but requires a bit more technical fuss — if you're unsure, start with Method A.

🧠
Don't want to figure it out yourself? For this, there's a second document — download the guide for AI. Open a new chat with the AI, attach the file, and it will walk you through these steps and help you insert the key where it needs to go.

08Important: You do NOT need App Review

The biggest fear is, "Do I need to go through app review, record videos, wait for weeks?" My direct answer:

For YOUR account — no. While the app is in Development mode, it works seamlessly with accounts that belong to you or are added as testers. Your Instagram account is one such account. App Review and business verification are only required for a public service under other people's accounts.

So, for the task of "connecting my blog to my neural network," you follow the steps — and that's it. No waiting screens or moderation.

09Token renewal every 60 days

The only regular concern. The key lives for 60 days — then the neural network will say "token expired." This isn't a breakdown, but an expiration date.

What to doHow
Update manuallyGo to developers.facebook.com → your app → Instagram → for the account, click Generate token again (or repeat the token exchange in the advanced path). Insert the new key into .env over the old one.
Update automaticallyThe key can be extended via an API request (after the first 24 hours). Your neural network can do this on a schedule — ask it to "set up automatic Instagram token renewal every 50 days."
📅
Practical tip: set a calendar reminder every ~50 days to "renew Instagram key." Two minutes, and your connection is live again.

10If something went wrong

Common error messages and what they mean in plain English.

What you seeWhat it means and what to do
"This account is not a professional account" / API doesn't see the accountYour Instagram is still a personal account. Switch to Business/Creator (section 03), wait a couple of minutes.
(#10) Application does not have permissionMissing a permission checkbox. Go back to Permissions and add the necessary one (e.g., content_publish).
"token expired" / (#190)60 days have passed. Renew the key (section 09). This is expected.
Publishing Reels: status: ERRORUsually, the video is unavailable via the link, or the format/length is incorrect. Reels should be MP4, 3–90 seconds, 9:16 vertical, with the file accessible via a public link.
No "API Setup with Instagram Login" optionFirst, click Set up on the Instagram product card — the option will then appear in the left menu.
Clicking the link "downloads" the pageThis happens when the file is opened locally (file://). Open this guide via the web link (Vercel) — links open normally there.

11Glossary of unfamiliar terms

Meta AppNot a download program, but an entry in the developer console that can issue access keys to your Instagram.
Access tokenA long string-key. Replaces a password for programs: grants exactly the permissions you've selected, and can be revoked.
App ID and App SecretThe number and secret code of your app. Needed for the advanced path to extend the key. The Secret is like a password, don't share it.
IG_USER_IDThe numerical ID of your Instagram account. The API uses it to know which blog to access.
Permissions / ScopesCheckboxes for "what can be done": read, publish, reply to comments. Fewer permissions mean more security.
Graph API ExplorerGraph API Explorer
MCP-serverAn "adapter" that connects Instagram to an AI (e.g., Claude) as an integrated tool.
Dev-mode (Development)The initial mode for an app. Works with your accounts without Meta review. Sufficient for personal use.

12Live video and screenshots

Meta screens periodically change their appearance, and live clicks are better seen in videos. Here are verified sources with screenshots and breakdowns (in English, but the pictures make everything clear).

Video breakdown "Generate Instagram Access Token" (2025)Real screen, all clicks step-by-step — closest to the simple path
Watch →

Continue Reading

AI in plain, human terms.

The CHI blog features tool breakdowns, business cases, and practical frameworks for those launching, selling, designing, and building processes with AI.

Go to Blog

AI Muse Newsletter

Receive the next digest in your inbox.

Once a week — one useful email about AI: new tools, business cases, and content ideas.

No spam. Only digests and useful updates.